
The Science Behind Sizzling Success
The magic behind achieving truly outstanding Keto One-Skillet Chicken Thighs lies in understanding a few key scientific principles. First, Maillard reaction. This chemical reaction between amino acids and reducing sugars gives browned food its distinctive flavor. For chicken skin, a hot pan and relatively dry surface are essential. Moisture inhibits the Maillard reaction. Secondly, fat rendering. Chicken thighs, being relatively fatty, require enough heat and time to render the fat, which contributes to both flavor and crispy skin. Finally, internal temperature. Chicken needs to reach a safe internal temperature of 165°F (74°C) to be considered fully cooked. But holding it at that temperature for too long results in dry chicken.The Ultimate Keto One-Skillet Chicken Thighs Recipe
 This recipe is designed to deliver maximum flavor and perfect texture, every single time.
Ingredients:
- 6 bone-in, skin-on chicken thighs (about 2.5 pounds total)
- 2 tablespoons olive oil
- 1 medium yellow onion, thinly sliced
- 4 cloves garlic, minced
- 8 ounces mushrooms, sliced (cremini, button, or a mix)
- 1 cup chicken broth (low sodium)
- 1/2 cup heavy cream
- 2 tablespoons Dijon mustard
- 1/4 cup chopped fresh parsley
- 1 teaspoon dried thyme
- 1/2 teaspoon smoked paprika
- Salt and freshly ground black pepper to taste
Equipment:
- 12-inch cast iron skillet (or oven-safe skillet)
- Instant-read thermometer
Instructions:
- Prepare the Chicken: Pat the chicken thighs completely dry with paper towels. Season generously with salt, pepper, thyme, and smoked paprika.
- Sear the Chicken: Heat the olive oil in the skillet over medium-high heat until shimmering. Place the chicken thighs skin-side down in the skillet, being careful not to overcrowd the pan. You may need to work in batches. Sear for 6-8 minutes, or until the skin is golden brown and crispy. Flip and sear for another 3-4 minutes. Remove the chicken from the skillet and set aside.
- Sauté the Vegetables: Add the sliced onion to the skillet and cook until softened and translucent, about 5 minutes. Add the minced garlic and sliced mushrooms, and cook until the mushrooms are tender and have released their moisture, about 8 minutes.
- Create the Sauce: Pour the chicken broth into the skillet, scraping up any browned bits from the bottom (deglazing). Bring to a simmer and cook for a few minutes to reduce slightly. Stir in the heavy cream and Dijon mustard. Season with salt and pepper to taste.
- Combine and Bake (or Simmer): Place the seared chicken thighs back into the skillet, nestling them among the vegetables and sauce. If using a cast iron skillet, transfer the skillet to a preheated oven at 375°F (190°C) and bake for 20-25 minutes, or until the chicken is cooked through and reaches an internal temperature of 165°F (74°C). Alternatively, if not using an oven-safe skillet, reduce the heat to low, cover the skillet, and simmer for 25-30 minutes, or until the chicken is cooked through.
- Garnish and Serve: Remove the skillet from the oven (or stove). Sprinkle with fresh parsley and serve immediately.
My Keto Chicken Thigh Investigation: A Tale of Crispy Skin and Juicy Interiors
My quest for the perfect Keto One-Skillet Chicken Thighs wasn’t exactly smooth sailing. My first few attempts were a disaster of either burnt skin and raw insides or perfectly cooked chicken swimming in a watery, flavorless sauce. Like many of you, I initially thought the key was just throwing everything into a skillet and hoping for the best. The reality, however, was much more nuanced.The Soggy Skin Saga
My initial hurdle was achieving truly crispy skin. I tried everything: higher heat, longer cooking times, even pre-salting the chicken. Nothing seemed to consistently deliver that satisfying crunch. The skin would either burn before the chicken was cooked through or remain stubbornly flabby. I even tried using a different fat source, experimenting with coconut oil instead of olive oil. The coconut oil definitely added a unique flavor, but didn’t solve the crispiness issue. I considered making a Skillet Chicken With Veggies but didn’t want the carbs.The Internal Temperature Trauma
Once I conquered the skin issue, the next challenge was ensuring the chicken was cooked through without drying it out. I religiously used my instant-read thermometer, but I still ended up with chicken that was either undercooked near the bone or as dry as the Sahara. I even started contemplating ditching the skillet approach altogether and opting for something like a Chicken Spinach Mushroom Bake.The “Aha!” Moment: The Two-Stage Cooking Process
Then, I had an “Aha!” moment. I realized that the solution lay in a two-stage cooking process: searing and then either baking or simmering. Searing the chicken skin-side down in a hot skillet first allowed me to achieve that crucial crispy texture. Then, finishing the cooking process in the oven or with a covered simmer ensured that the chicken was cooked through evenly without drying out. Plus, deglazing the pan with chicken broth after searing unlocked all those delicious browned bits, adding depth and complexity to the sauce. This also helped me avoid a soggy sauce, a common problem I faced while trying to recreate something similar to Keto Chicken Cream Cheese Soup, but in solid form.The Sauce Solution: Keto-Friendly Creaminess
Finally, the sauce. I wanted something creamy, flavorful, and, of course, keto-friendly. Heavy cream was the obvious choice for richness, but I needed something to balance the richness and add a touch of tang. Dijon mustard proved to be the perfect ingredient, adding a subtle zing that complemented the earthy mushrooms and savory chicken. I also found that a touch of smoked paprika added a wonderful depth of flavor that elevated the dish to another level. I considered adding sun-dried tomatoes and olives for a Mediterranean Keto Chicken Skillet vibe but ultimately wanted something less assertive. I even tried a version with different mushrooms, inspired by Garlic Mushroom Chicken Thighs, but found the blend in the recipe was the best balance of flavor and texture. A later attempt resulted in something similar to Creamy Keto Garlic Mushroom Chicken Casserole, proving that the flavor profile works in various preparations.The Foolproof Technique: Your Guide to Keto Chicken Thigh Perfection
Here’s the definitive technique for achieving perfect Keto One-Skillet Chicken Thighs, every time:- Dry is Key: Pat the chicken thighs completely dry before seasoning. This is crucial for crispy skin.
- High Heat Searing: Use medium-high heat to sear the chicken skin-side down until golden brown and crispy. Don’t overcrowd the pan; work in batches if necessary.
- Deglaze Like a Pro: Don’t skip deglazing the pan with chicken broth after searing. Those browned bits are flavor gold!
- Two-Stage Cooking: Finish cooking the chicken in a preheated oven or with a covered simmer on the stovetop to ensure even cooking and prevent drying out.
- Thermometer is Your Friend: Use an instant-read thermometer to check for doneness. The internal temperature should reach 165°F (74°C).
- Don’t Overcrowd: Make sure chicken thighs aren’t crammed together in the pan, preventing them from browning properly.
- Adjust Seasoning: Taste the sauce before returning the chicken to the pan. Adjust seasoning as needed to achieve the desired flavor profile.
What is the key to achieving crispy skin on the chicken thighs in this recipe?
Patting the chicken thighs completely dry before seasoning and searing them skin-side down in a hot skillet are crucial for achieving crispy skin.
Why is it important to sear the chicken before baking or simmering it?
Searing the chicken first allows you to achieve crispy skin. Finishing the cooking process in the oven or with a covered simmer ensures the chicken cooks through evenly without drying out.
How do I ensure the chicken is fully cooked without drying it out?
Use an instant-read thermometer to check the internal temperature. The chicken should reach 165°F (74°C). The two-stage cooking process of searing then baking or simmering helps to ensure even cooking without drying.
What makes this recipe keto-friendly?
The recipe uses low-carb ingredients like chicken thighs, olive oil, mushrooms, and heavy cream. It avoids high-carb ingredients like sugar and flour.
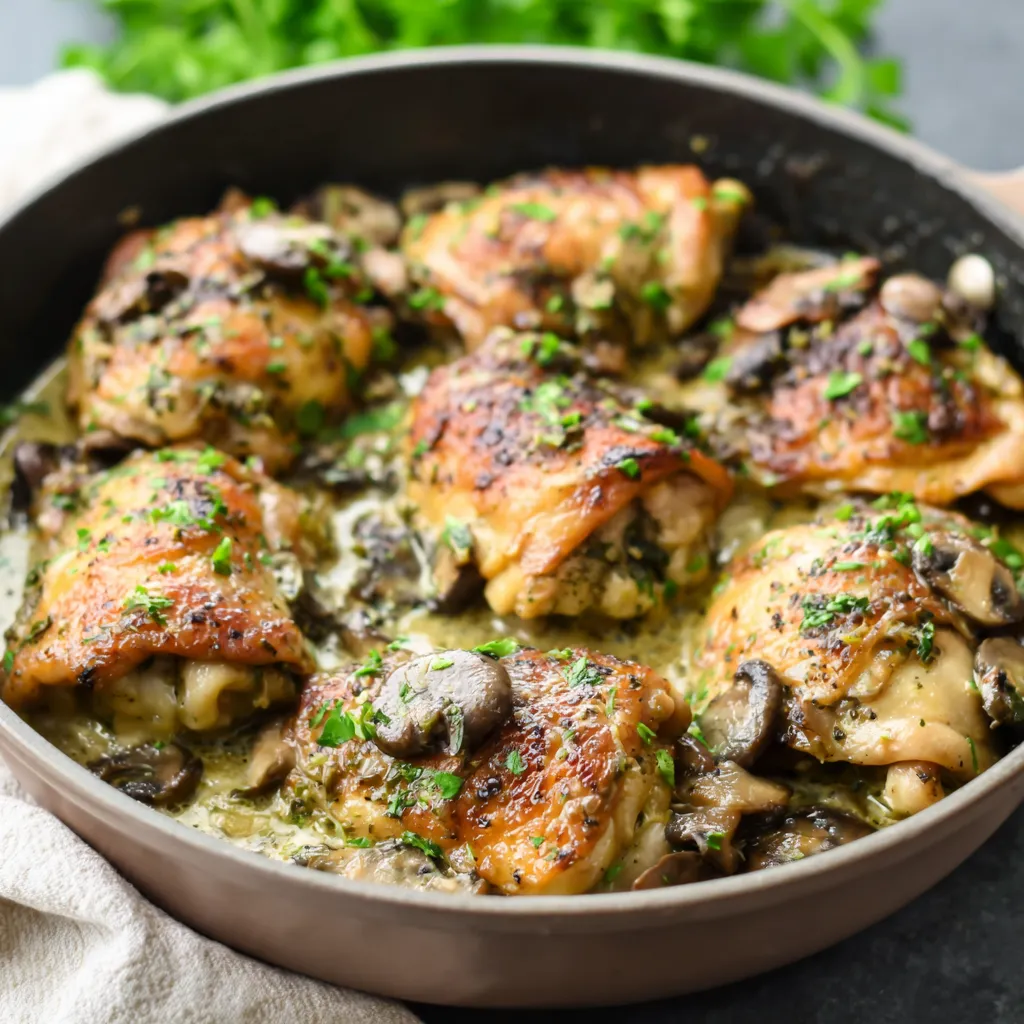
Irresistible Keto One-Skillet Chicken Thighs
This recipe delivers perfectly cooked, juicy chicken thighs with crispy skin in a single skillet, while adhering to a ketogenic diet. The two-stage cooking process of searing and baking or simmering ensures even cooking and prevents drying out, with a creamy Dijon mustard sauce for added flavor.
Ingredients
Equipment
Method
- Prepare the Chicken: Pat the chicken thighs completely dry with paper towels. Season generously with salt, pepper, thyme, and smoked paprika.
- Sear the Chicken: Heat the olive oil in the skillet over medium-high heat until shimmering. Place the chicken thighs skin-side down in the skillet, being careful not to overcrowd the pan. You may need to work in batches. Sear for 6-8 minutes, or until the skin is golden brown and crispy. Flip and sear for another 3-4 minutes. Remove the chicken from the skillet and set aside.
- Sauté the Vegetables: Add the sliced onion to the skillet and cook until softened and translucent, about 5 minutes. Add the minced garlic and sliced mushrooms, and cook until the mushrooms are tender and have released their moisture, about 8 minutes.
- Create the Sauce: Pour the chicken broth into the skillet, scraping up any browned bits from the bottom (deglazing). Bring to a simmer and cook for a few minutes to reduce slightly. Stir in the heavy cream and Dijon mustard. Season with salt and pepper to taste.
- Combine and Bake (or Simmer): Place the seared chicken thighs back into the skillet, nestling them among the vegetables and sauce. If using a cast iron skillet, transfer the skillet to a preheated oven at 375°F (190°C) and bake for 20-25 minutes, or until the chicken is cooked through and reaches an internal temperature of 165°F (74°C). Alternatively, if not using an oven-safe skillet, reduce the heat to low, cover the skillet, and simmer for 25-30 minutes, or until the chicken is cooked through.
- Garnish and Serve: Remove the skillet from the oven (or stove). Sprinkle with fresh parsley and serve immediately.
Notes
For extra crispy skin, ensure the chicken thighs are very dry before searing. Don’t overcrowd the pan when searing to ensure proper browning. Taste and adjust seasoning of the sauce before returning the chicken to the skillet. Store leftovers in an airtight container in the refrigerator for up to 3 days. You can substitute other keto-friendly vegetables for the mushrooms and onions, such as bell peppers or zucchini.


")