
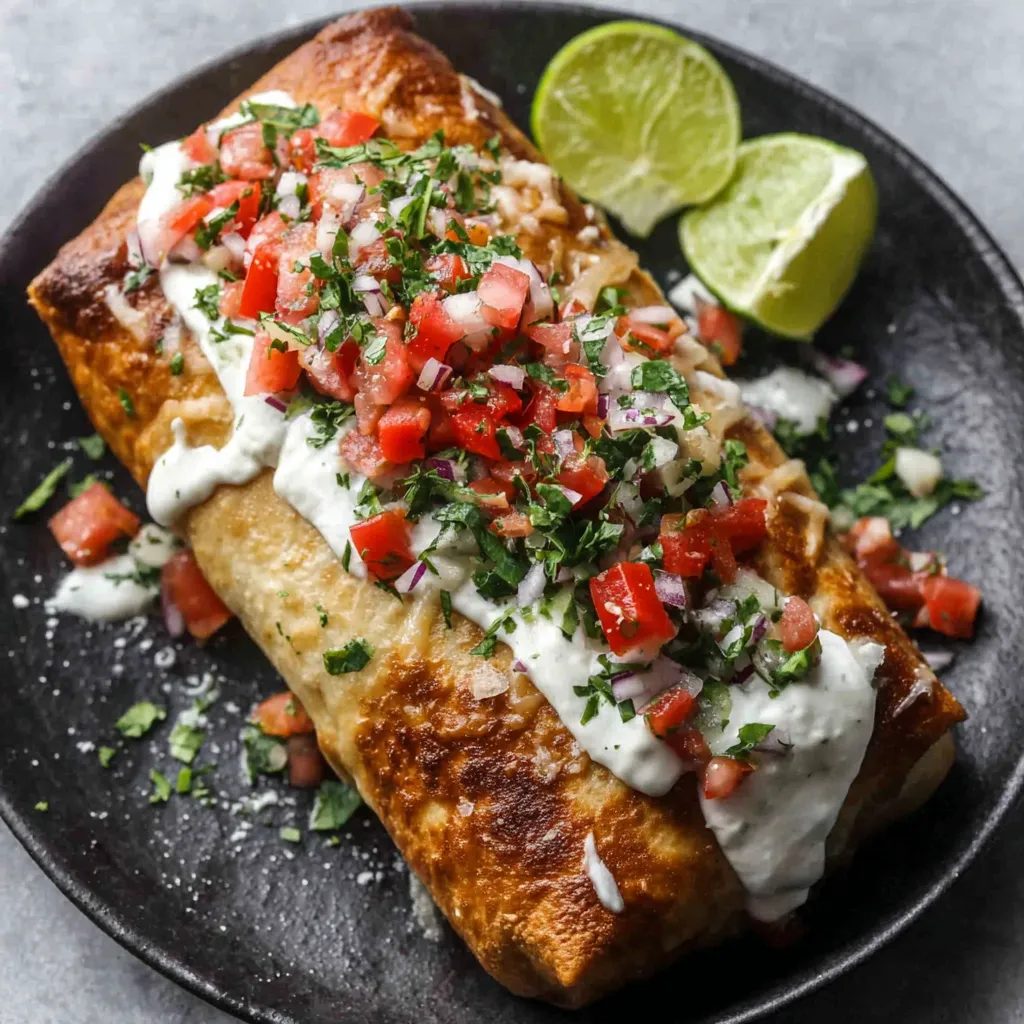
The Alchemist’s Corner: Unveiling the Chimichanga’s Secrets
Before we dive into the deep fryer (figuratively, for now!), let’s understand the science behind this Tex-Mex delight. A chimichanga, at its core, is a deep-fried burrito. But the magic – or the misery – lies in the details. First, consider the tortilla. Too thin, and it’ll disintegrate in the oil. Too thick, and it’ll absorb excessive grease and become leaden. We need a tortilla that can withstand the heat and maintain its structural integrity while still crisping up beautifully. This means opting for a flour tortilla – typically a large, burrito-sized one – with a robust texture. Think of it like the foundation of a skyscraper; it needs to be strong. Next, the filling. Moisture is the enemy. Excess moisture leads to soggy tortillas, steam explosions in the fryer (a messy and potentially dangerous situation), and a generally unpleasant texture. Therefore, pre-cooking the chicken and other ingredients is crucial to remove excess liquid. Using drier cheeses, like Monterey Jack or a Mexican blend, rather than overly creamy cheeses, also helps. We aim for a flavorful, cohesive filling that won’t weep once it hits the hot oil. Think of it as carefully balancing the wet and dry ingredients like a baker making dough. Finally, the frying itself. Temperature is paramount. Too low, and the chimichanga will absorb too much oil, resulting in a greasy, sad experience. Too high, and the exterior will burn before the interior is heated through. We’re aiming for a golden-brown, crispy shell and a piping-hot, melty interior. Using a neutral-flavored oil with a high smoke point, like canola or vegetable oil, is essential. It’s all about finding the sweet spot, the Goldilocks zone of frying.The Ultimate Chicken Chimichanga Recipe

Ingredients:
- For the Chicken Filling:
- 1.5 lbs boneless, skinless chicken breasts
- 1 tbsp olive oil
- 1 medium onion, chopped
- 1 bell pepper (any color), chopped
- 1 packet (1 oz) taco seasoning
- 1/2 cup chicken broth
- 1 (15 oz) can black beans, rinsed and drained
- 1 (15 oz) can corn, drained
- 1 cup shredded Monterey Jack cheese (or Mexican blend)
- For the Chimichangas:
- 6 large (10-12 inch) flour tortillas
- Vegetable or canola oil, for frying
- Optional Toppings:
- Sour cream
- Guacamole
- Salsa
- Chopped cilantro
Instructions:
- Prepare the Chicken: Cook the chicken breasts using your preferred method (boiling, baking, or grilling). Once cooked, shred the chicken using two forks.
- Sauté Vegetables: Heat the olive oil in a large skillet over medium heat. Add the chopped onion and bell pepper and cook until softened, about 5-7 minutes.
- Combine Filling Ingredients: Add the shredded chicken, taco seasoning, and chicken broth to the skillet. Stir well to combine. Bring to a simmer and cook for 5 minutes, allowing the flavors to meld.
- Add Beans and Corn: Stir in the black beans and corn. Cook for another 3-5 minutes, until heated through.
- Remove from Heat and Add Cheese: Remove the skillet from the heat and stir in the shredded cheese until melted and evenly distributed throughout the filling. Allow the filling to cool slightly. This is critical to prevent soggy tortillas!
- Assemble the Chimichangas: Warm the tortillas slightly to make them more pliable (you can microwave them for 15-20 seconds, wrapped in a damp paper towel). Place about 1 cup of the chicken filling in the center of each tortilla.
- Fold the Chimichangas: Fold in the sides of the tortilla, then fold the bottom up and over the filling. Roll tightly to create a burrito shape. Secure with toothpicks if necessary.
- Heat the Oil: Pour about 1-2 inches of vegetable or canola oil into a large, heavy-bottomed pot or deep skillet. Heat the oil over medium-high heat to 350°F (175°C). Use a thermometer to ensure accurate temperature.
- Fry the Chimichangas: Carefully place 1-2 chimichangas into the hot oil (do not overcrowd the pot). Fry for 2-3 minutes per side, or until golden brown and crispy.
- Drain and Serve: Remove the chimichangas from the oil and place them on a wire rack lined with paper towels to drain excess oil. Remove toothpicks (if used). Serve immediately with your favorite toppings.
The Culinary Crime Scene: My Chimichanga Journey
The Soggy Beginnings: A Tale of Woe
My first few attempts were a disaster. I overloaded the tortillas with filling, didn’t drain the beans properly, and used oil that wasn’t hot enough. The result? Soggy, greasy chimichangas that tasted more like disappointment than deliciousness. Like many of you, I initially thought that making chimichangas at home was a fool’s errand, best left to the professionals. I considered giving up and just making Sheet Pan Chicken Fajitas instead.The Moisture Menace: Cracking the Code
Then, I had an “Aha!” moment. I realized that moisture was the root of all evil. I started pre-cooking the chicken more thoroughly, draining the beans and corn religiously, and even experimenting with different types of cheese. I also discovered the importance of letting the filling cool slightly before assembling the chimichangas. This allowed the excess moisture to evaporate, resulting in a drier, more manageable filling.The Tortilla Tango: Finding the Right Partner
Next, I tackled the tortilla issue. I experimented with different brands and sizes, eventually settling on a large, burrito-sized flour tortilla with a slightly thicker texture. I also learned the importance of warming the tortillas slightly before assembling the chimichangas. This made them more pliable and less likely to tear during folding. I thought about how similar this process was to making Baked Cream Cheese Chicken Taquitos, where pliable tortillas are also key.The Frying Frontier: Taming the Heat
Finally, I conquered the frying process. I invested in a good-quality thermometer to ensure accurate oil temperature. I also learned the importance of not overcrowding the pot. Frying too many chimichangas at once lowers the oil temperature, resulting in greasy, undercooked results. I started frying them in batches, allowing the oil temperature to recover between each batch. I remembered how my grandma always said to never overcrowd the pan when making Chicken Taco Soup.The Crispy Revelation: Victory at Last!
After countless attempts, I finally achieved chimichanga perfection. The tortillas were golden brown and crispy, the filling was hot and flavorful, and there wasn’t a hint of sogginess in sight. It was a moment of pure culinary triumph. Now, I often use similar filling to make Mexican Chicken Cheese Rice Casserole, knowing the flavors work so well together.The Chimichanga Commandments: The Foolproof Method
Here’s the ultimate guide to making perfect Chicken Chimichangas, distilled from my trials and tribulations:- Conquer the Moisture: Pre-cook chicken thoroughly, drain beans and corn meticulously, and let the filling cool slightly before assembling.
- Choose Wisely, Tortilla Warrior: Opt for large, burrito-sized flour tortillas with a slightly thicker texture. Warm them slightly before use.
- Thermometer is Your Trusty Sidekick: Maintain a consistent oil temperature of 350°F (175°C) using a thermometer.
- Patience, Young Padawan: Fry in batches, avoiding overcrowding, and allow the oil temperature to recover between batches. This is vital, and I also do the same when making Chicken Street Tacos.
- Drain with Diligence: Drain the fried chimichangas on a wire rack lined with paper towels to remove excess oil.
- Serve and Savor: Serve immediately with your favorite toppings and enjoy the fruits of your labor! If you have leftovers, try making Chicken Enchilada Casserole.
What is the most important factor to consider when making chicken chimichangas to avoid a soggy result?
Managing moisture is key. Pre-cook the chicken thoroughly, drain the beans and corn meticulously, and allow the filling to cool slightly before assembling the chimichangas.
What type of tortilla is best for making chimichangas, and why?
Large, burrito-sized flour tortillas with a slightly thicker texture are best because they can withstand the heat of frying without disintegrating or absorbing too much oil. Warming them slightly before use also makes them more pliable and less likely to tear.
What is the ideal oil temperature for frying chimichangas, and why is maintaining the correct temperature important?
The ideal oil temperature is 350°F (175°C). Maintaining this temperature ensures that the chimichangas become golden brown and crispy without absorbing too much oil or burning on the outside before the inside is heated through.
Why is it important not to overcrowd the pot when frying chimichangas?
Overcrowding the pot lowers the oil temperature, which can result in greasy, undercooked chimichangas. It’s best to fry them in batches, allowing the oil temperature to recover between each batch.
Best Chicken Chimichangas Ever
Ingredients
Equipment
Method
- Cook the chicken breasts using your preferred method (boiling, baking, or grilling). Once cooked, shred the chicken using two forks.
- Heat the olive oil in a large skillet over medium heat. Add the chopped onion and bell pepper and cook until softened, about 5-7 minutes.
- Add the shredded chicken, taco seasoning, and chicken broth to the skillet. Stir well to combine. Bring to a simmer and cook for 5 minutes, allowing the flavors to meld.
- Stir in the black beans and corn. Cook for another 3-5 minutes, until heated through.
- Remove the skillet from the heat and stir in the shredded cheese until melted and evenly distributed throughout the filling. Allow the filling to cool slightly.
- Warm the tortillas slightly to make them more pliable (you can microwave them for 15-20 seconds, wrapped in a damp paper towel).
- Place about 1 cup of the chicken filling in the center of each tortilla.
- Fold in the sides of the tortilla, then fold the bottom up and over the filling. Roll tightly to create a burrito shape. Secure with toothpicks if necessary.
- Pour about 1-2 inches of vegetable or canola oil into a large, heavy-bottomed pot or deep skillet. Heat the oil over medium-high heat to 350°F (175°C). Use a thermometer to ensure accurate temperature.
- Carefully place 1-2 chimichangas into the hot oil (do not overcrowd the pot). Fry for 2-3 minutes per side, or until golden brown and crispy.
- Remove the chimichangas from the oil and place them on a wire rack lined with paper towels to drain excess oil. Remove toothpicks (if used).
- Serve immediately with your favorite toppings.

")