
The Alchemic Reactions: Understanding the Science Behind Stuffed Chicken
The core challenge lies in cooking the chicken breast evenly without drying it out while ensuring the mushroom filling is cooked through and flavorful. This involves understanding a few key scientific principles:- Protein Denaturation: Chicken, being primarily protein, denatures when heated. This causes the proteins to unwind and coagulate, leading to a firmer texture. Overcooking causes excessive denaturation, squeezing out moisture and resulting in a dry, rubbery texture. The ideal internal temperature for chicken breast is 165°F (74°C).
- Moisture Retention: Stuffing the chicken helps retain moisture during cooking. The filling acts as a barrier, preventing the chicken from drying out as quickly. However, the filling itself needs to be cooked properly to avoid a soggy texture.
- Heat Transfer: The method of cooking significantly impacts heat transfer. Searing the chicken first helps develop flavor through the Maillard reaction, creating complex, savory compounds on the surface. Baking allows for gentle, even cooking, minimizing the risk of overcooking.
- Mushroom Chemistry: Mushrooms are primarily water. When cooked, they release this water. Failing to properly evaporate this moisture results in a soggy filling. High heat and proper fat content (butter, in this case) are essential to browning the mushrooms and concentrating their flavor. Consider how the Garlic Thyme Roasted Mushrooms recipe tackles moisture.
The Culinary Blueprint: Recipe for Chicken Breasts Stuffed With Garlic Butter Mushrooms
 Here’s a detailed recipe, incorporating the scientific principles above, to guide you toward perfectly cooked, flavorful chicken breasts stuffed with garlic butter mushrooms.
Ingredients:
- 4 boneless, skinless chicken breasts (about 6-8 ounces each)
- 1 pound cremini mushrooms, sliced
- 4 cloves garlic, minced
- 4 tablespoons butter, divided
- 2 tablespoons olive oil
- 1/4 cup dry white wine (optional)
- 1/4 cup chopped fresh parsley
- 1/4 cup grated Parmesan cheese
- Salt and freshly ground black pepper to taste
- 1 teaspoon dried thyme
- 1/2 teaspoon red pepper flakes (optional)
Equipment
- Large skillet (oven-safe if possible)
- Baking dish (if skillet is not oven-safe)
- Meat thermometer
Instructions:
- Prepare the Chicken: Preheat oven to 375°F (190°C). Butterfly the chicken breasts by slicing horizontally almost all the way through, then opening them like a book. Season both sides with salt, pepper, and thyme.
- Sauté the Mushrooms: In a large skillet, melt 2 tablespoons of butter with 2 tablespoons of olive oil over medium-high heat. Add the sliced mushrooms and cook, stirring occasionally, until they release their moisture and begin to brown, about 8-10 minutes. This step is crucial for preventing a soggy filling.
- Add Garlic and Wine: Add the minced garlic and red pepper flakes (if using) to the skillet and cook for another minute until fragrant. Pour in the white wine (if using) and let it simmer for a minute or two, scraping up any browned bits from the bottom of the pan. This adds depth of flavor.
- Finish the Filling: Remove the skillet from the heat and stir in the remaining 2 tablespoons of butter, parsley, and Parmesan cheese. Season with salt and pepper to taste.
- Stuff the Chicken: Divide the mushroom mixture evenly among the butterflied chicken breasts. Fold the chicken over the filling and secure with toothpicks or kitchen twine.
- Sear the Chicken (Optional but Recommended): If your skillet is oven-safe, return it to medium-high heat. If not, transfer the chicken to a baking dish. Melt the remaining tablespoon of butter in the skillet (or baking dish) and sear the chicken breasts for 2-3 minutes per side, until golden brown. Searing helps develop flavor and seals in moisture.
- Bake the Chicken: Transfer the skillet (or baking dish) to the preheated oven and bake for 20-25 minutes, or until the internal temperature of the chicken reaches 165°F (74°C). Use a meat thermometer to ensure accuracy.
- Rest and Serve: Remove the chicken from the oven and let it rest for 5-10 minutes before serving. This allows the juices to redistribute, resulting in a more tender and flavorful chicken breast. Remove toothpicks or twine before serving. Serve with your favorite sides.
My Quest for the Perfect Stuffed Chicken: A Culinary Investigation
My journey to master chicken breasts stuffed with garlic butter mushrooms wasn’t exactly smooth. My first few attempts were a disaster, resulting in either dry chicken or a soggy, flavorless filling. Then, I had an “Aha!” moment: it wasn’t enough to just stuff the chicken and bake it. The key was understanding the science behind each step.The Soggy Situation: Taming the Mushroom Moisture
Like many of you, I initially thought throwing raw mushrooms into the chicken breast cavity was the way to go. Big mistake! The mushrooms released all their water during baking, creating a watery, diluted sauce that did nothing for the chicken’s flavor or texture. I knew I needed to address this. My solution? Pre-cooking the mushrooms.The Dry Desert: Conquering the Overcooked Chicken
My next challenge was consistently overcooked chicken. I was so worried about the filling being cooked through that I ended up with dry, tough chicken breasts. I realized I needed a more precise way to monitor the chicken’s internal temperature. Enter the meat thermometer! This simple tool made a world of difference. I also started experimenting with searing the chicken before baking, which helped to seal in the juices.The Flavor Fiasco: Injecting Some Zest
Even when the chicken and mushrooms were cooked properly, the flavor was often underwhelming. I experimented with different herbs and spices, eventually landing on the combination of garlic, thyme, parsley, and a touch of red pepper flakes. The addition of white wine to the mushroom mixture also added a subtle acidity and complexity that elevated the dish. I even experimented with different cheeses, but found that Parmesan offered the best balance of flavor and texture. This reminded me of the Roasted Red Pepper Mozzarella Stuffed Chicken, which also taught me the importance of the cheese you use to get the best results.The Structural Struggle: Keeping it All Together
Initially, the filling would spill out during cooking. Toothpicks helped, but they were a bit of a hassle. I found that using kitchen twine created a more secure seal and looked more elegant. The trick is to tie the twine tightly enough to hold the filling in, but not so tightly that it squeezes the chicken breast.The Foolproof Technique: A Step-by-Step Guide to Perfection
After numerous attempts, I’ve distilled the process into a foolproof technique:- Butterfly and Season: Butterfly the chicken breasts and season generously with salt, pepper, and thyme.
- Pre-Cook the Mushrooms: Sauté the sliced mushrooms in butter and olive oil until they release their moisture and begin to brown.
- Add Aromatics: Add minced garlic, red pepper flakes (optional), and white wine (optional) to the mushrooms for added flavor.
- Finish the Filling: Stir in fresh parsley and Parmesan cheese.
- Stuff Generously: Divide the mushroom mixture evenly among the butterflied chicken breasts.
- Secure the Filling: Fold the chicken over the filling and secure with toothpicks or kitchen twine.
- Sear for Flavor: Sear the chicken breasts in butter until golden brown on both sides.
- Bake to Perfection: Bake in a preheated oven until the internal temperature reaches 165°F (74°C).
- Rest and Enjoy: Let the chicken rest for 5-10 minutes before serving.
Why is it important to pre-cook the mushrooms before stuffing them into the chicken?
Pre-cooking the mushrooms is crucial to prevent a soggy filling. Mushrooms release a lot of water when cooked, so sautéing them beforehand allows the moisture to evaporate and concentrates their flavor.
What is the ideal internal temperature for the chicken breasts to ensure they are cooked properly?
The ideal internal temperature for chicken breasts is 165°F (74°C). Using a meat thermometer is recommended to ensure accuracy.
Why is it recommended to sear the chicken breasts before baking them?
Searing the chicken breasts before baking helps develop flavor through the Maillard reaction and seals in moisture, resulting in a more flavorful and juicy chicken breast.
What can I use to secure the filling inside the chicken breasts?
You can use toothpicks or kitchen twine to secure the filling inside the chicken breasts. Kitchen twine is suggested as a more elegant way to seal the filling.
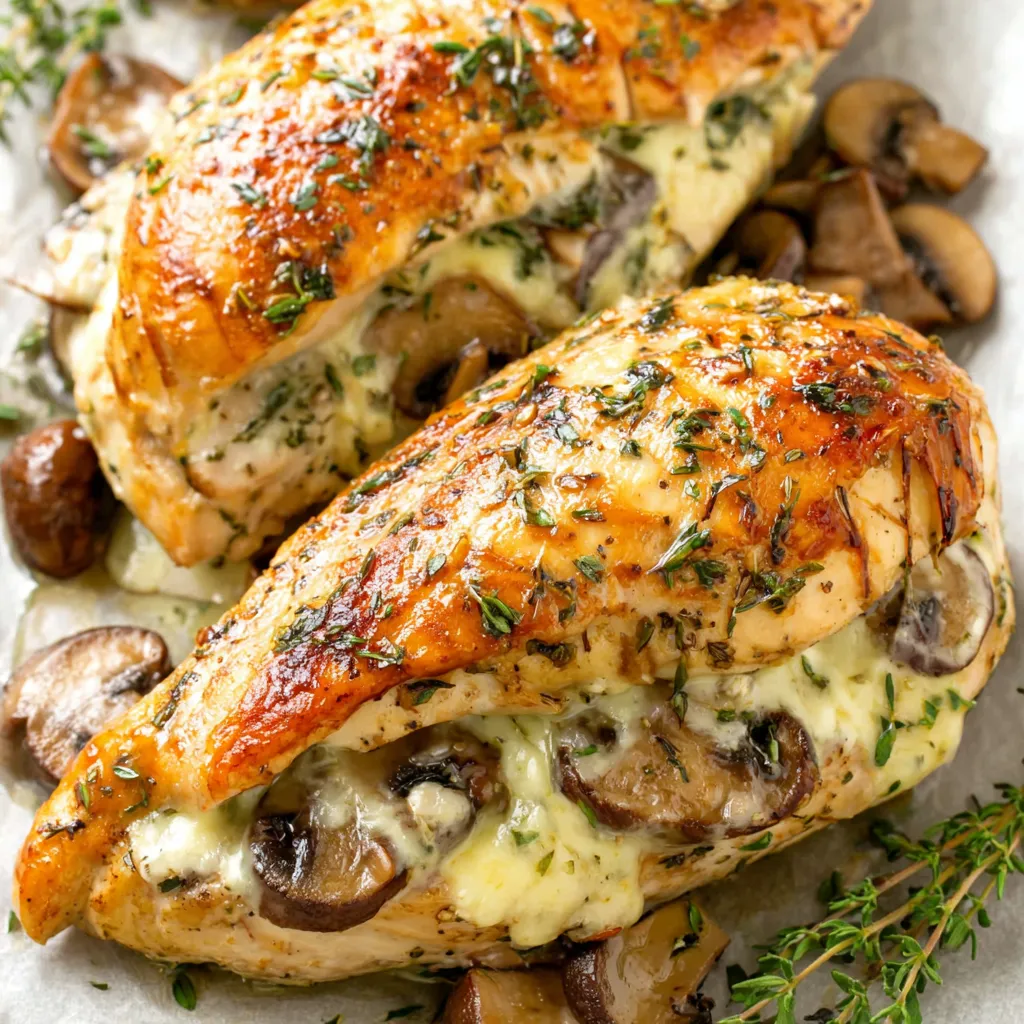
Amazing Chicken Breasts Stuffed with Garlic Butter Mushrooms
These chicken breasts are butterflied and stuffed with a savory mixture of garlic, butter, mushrooms, and Parmesan cheese, then baked to perfection. The secret lies in pre-cooking the mushrooms to prevent a soggy filling and using a meat thermometer to ensure juicy, perfectly cooked chicken every time. Sear the chicken for extra flavor and moisture.
Ingredients
Equipment
Method
- Preheat oven to 375°F (190°C).
- Butterfly the chicken breasts by slicing horizontally almost all the way through, then opening them like a book.
- Season both sides of the chicken with salt, pepper, and thyme.
- In a large skillet, melt 2 tablespoons of butter with 2 tablespoons of olive oil over medium-high heat.
- Add the sliced mushrooms and cook, stirring occasionally, until they release their moisture and begin to brown, about 8-10 minutes.
- Add the minced garlic and red pepper flakes (if using) to the skillet and cook for another minute until fragrant.
- Pour in the white wine (if using) and let it simmer for a minute or two, scraping up any browned bits from the bottom of the pan.
- Remove the skillet from the heat and stir in the remaining 2 tablespoons of butter, parsley, and Parmesan cheese. Season with salt and pepper to taste.
- Divide the mushroom mixture evenly among the butterflied chicken breasts.
- Fold the chicken over the filling and secure with toothpicks or kitchen twine.
- If your skillet is oven-safe, return it to medium-high heat. If not, transfer the chicken to a baking dish.
- Melt the remaining tablespoon of butter in the skillet (or baking dish) and sear the chicken breasts for 2-3 minutes per side, until golden brown.
- Transfer the skillet (or baking dish) to the preheated oven and bake for 20-25 minutes, or until the internal temperature of the chicken reaches 165°F (74°C). Use a meat thermometer to ensure accuracy.
- Remove the chicken from the oven and let it rest for 5-10 minutes before serving.
- Remove toothpicks or twine before serving. Serve with your favorite sides.
Notes
For best results, ensure the mushrooms are thoroughly cooked and browned before stuffing the chicken. This prevents a soggy filling. You can substitute the cremini mushrooms with other varieties like shiitake or portobello. Store leftover chicken in an airtight container in the refrigerator for up to 3 days. Reheat gently in the oven or microwave.

")