
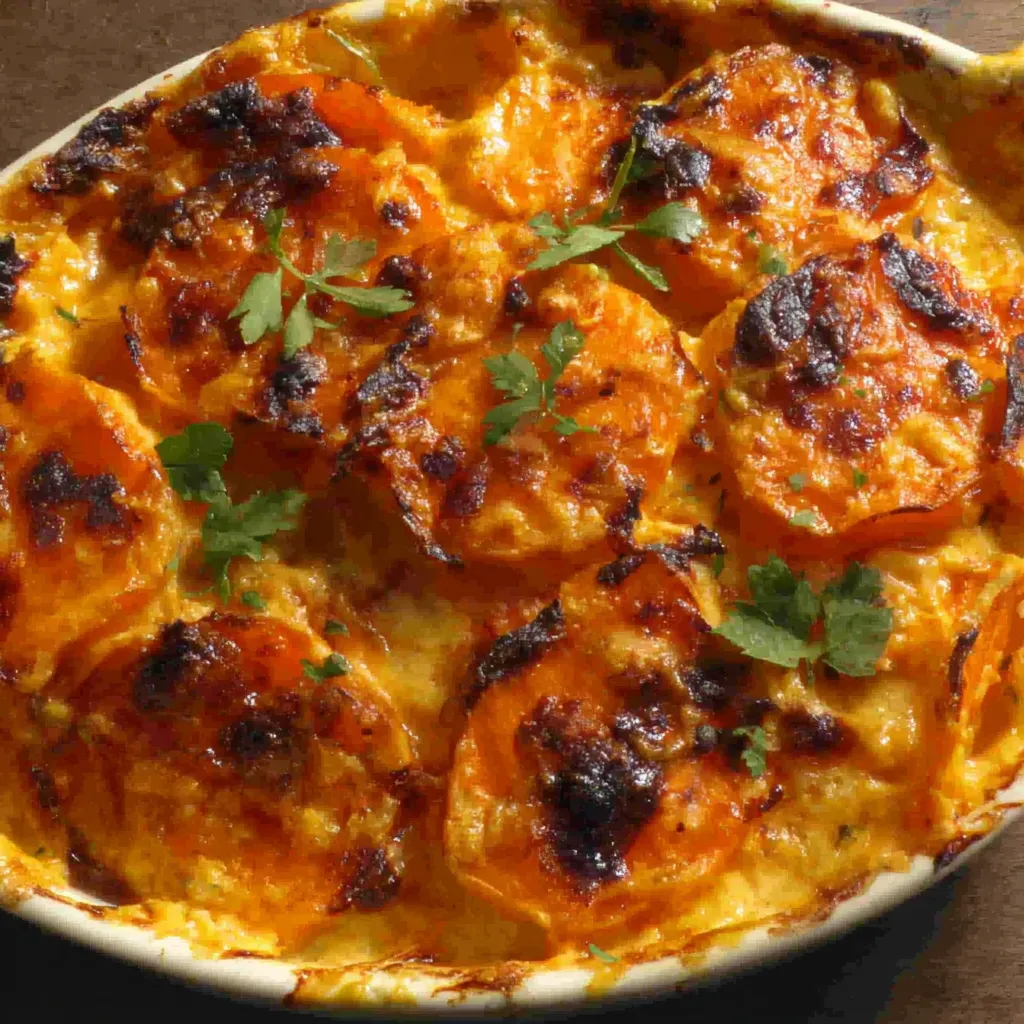
The Sweet Science of Scalloping
At its heart, a scalloped casserole is about layering thinly sliced ingredients (in this case, sweet potatoes) in a creamy sauce and baking until tender. The magic, or the potential for disaster, hinges on the starch content of the sweet potatoes and how they interact with the liquid and heat. Raw sweet potatoes are packed with starch granules. As they heat up, these granules absorb liquid and swell, a process called gelatinization. This is what thickens the sauce. However, if the process happens too quickly or unevenly, you end up with pockets of uncooked starch, resulting in a gritty or gummy texture. The type of dairy used is also crucial. High heat can cause milk to curdle, so choosing the right dairy products and understanding their behavior under heat is key to a smooth, luscious sauce. We also need to consider the acidity of any added ingredients. Acid can interfere with starch gelatinization, so striking the right balance of flavors is vital.The Grand Sweet Potato Scalloped Casserole Recipe
 This recipe is the culmination of countless experiments and taste tests. It yields a perfectly cooked, creamy, and flavorful sweet potato scalloped casserole every time.
Ingredients:
- 3 lbs sweet potatoes, peeled and thinly sliced (about 1/8 inch thick)
- 1 medium yellow onion, thinly sliced
- 4 cloves garlic, minced
- 1/4 cup unsalted butter
- 1/4 cup all-purpose flour
- 3 cups whole milk
- 1 cup heavy cream
- 1/2 teaspoon ground nutmeg
- 1/4 teaspoon ground cinnamon
- 1 teaspoon salt
- 1/2 teaspoon black pepper
- 1 cup shredded Gruyere cheese (or Swiss cheese)
- 1/2 cup grated Parmesan cheese
- 2 tablespoons chopped fresh sage (optional)
Equipment:
- 9×13 inch baking dish
- Large saucepan
- Mandoline or sharp knife
- Whisk
Instructions:
1. Prepare the Sweet Potatoes and Onion: Preheat oven to 375°F (190°C). Grease a 9×13 inch baking dish. Thinly slice the sweet potatoes and onion using a mandoline or sharp knife. Consistent thickness is key for even cooking. 2. Make the Cream Sauce: In a large saucepan, melt the butter over medium heat. Add the minced garlic and cook for about 30 seconds, until fragrant. Whisk in the flour and cook for 1-2 minutes, stirring constantly, to create a roux. Gradually whisk in the milk, ensuring there are no lumps. Bring to a simmer, stirring constantly. Reduce heat to low and simmer for 5-7 minutes, or until the sauce has thickened slightly. 3. Add Flavor: Stir in the heavy cream, nutmeg, cinnamon, salt, and pepper. Remove from heat. 4. Assemble the Casserole: Arrange a layer of sweet potato slices in the prepared baking dish, overlapping slightly. Top with a layer of onion slices. Drizzle about 1/3 of the cream sauce over the sweet potatoes and onions. Sprinkle with 1/3 of the Gruyere and Parmesan cheeses, and 1/3 of the sage (if using). Repeat layers twice more, ending with a layer of cheese. 5. Bake: Cover the baking dish with aluminum foil. Bake for 45 minutes. Remove the foil and bake for an additional 15-20 minutes, or until the sweet potatoes are tender and the cheese is golden brown and bubbly. A knife inserted into the sweet potatoes should meet little resistance. 6. Rest: Let the casserole rest for 10-15 minutes before serving. This allows the sauce to thicken slightly and the flavors to meld.Confessions of a Casserole Crusader: My Sweet Potato Journey
My first few attempts were a disaster. Honestly, they were. The sweet potatoes were either undercooked and crunchy, or the sauce was thin and watery. Like many of you, I initially thought it was just a matter of throwing everything together and hoping for the best. I was so wrong. This is the story of how I cracked the code.The Great Sweet Potato Thickness Debate
Initially, I was slicing the sweet potatoes too thick. My logic was that thicker slices would hold their shape better. But, the reality was that the thicker slices took longer to cook, leading to uneven cooking. The outer layers were mushy while the inner layers were still firm. Then, I had an “Aha!” moment when I invested in a mandoline. Suddenly, I could slice the sweet potatoes consistently at 1/8 inch thickness. This made a world of difference. The even slices cooked uniformly, creating a much better texture.The Dairy Dilemma
I experimented with different types of dairy. Initially, I used all milk, but the sauce was always too thin. Then I tried all cream, which was too rich and heavy. The perfect balance, I discovered, was a combination of whole milk and heavy cream. The whole milk provides the necessary liquid for the starch to gelatinize, while the heavy cream adds richness and body to the sauce, preventing it from being watery. I also learned that using cold milk straight from the refrigerator was a no-no. Room temperature milk incorporates better and prevents temperature shock that can lead to curdling.The Cheese Conundrum
The type of cheese also played a significant role. I initially used cheddar cheese, thinking it would add a sharp flavor. However, the cheddar cheese didn’t melt as smoothly and tended to separate. Gruyere cheese, on the other hand, melted beautifully and created a smooth, creamy texture. The Parmesan cheese added a salty, savory note that balanced the sweetness of the sweet potatoes.Flavor Fiesta: Balancing Sweet and Savory
Sweet potatoes are naturally sweet, so it’s important to balance that sweetness with savory elements. I experimented with different spices and herbs. Nutmeg and cinnamon added warmth and depth, while garlic and onion provided a savory counterpoint. The chopped fresh sage added a herbaceous note that complemented the sweet potatoes perfectly. I also found that browning the butter slightly before adding the flour added a nutty flavor that enhanced the overall taste of the casserole. While experimenting, I considered how this dish might pair with others. For instance, the savory components would complement a dish like Honey Garlic Sausage Sweet Potato Bake by adding a contrasting flavor profile. Similarly, the richness of the casserole might be a welcome addition to a meal featuring Steak Cheddar Potato Casserole Ultimate.The Foolproof Technique: A Casserole Creation Checklist
After countless experiments, I’ve distilled the process down to a simple, foolproof technique. Follow these steps, and you’ll be well on your way to sweet potato scalloped casserole perfection:- Consistent Slicing is Key: Use a mandoline or a very sharp knife to slice the sweet potatoes and onion to a consistent thickness of 1/8 inch. This ensures even cooking.
- The Perfect Roux: Cook the flour and butter for 1-2 minutes to create a roux. This will help thicken the sauce and prevent a floury taste.
- Dairy Harmony: Use a combination of whole milk and heavy cream for the sauce. This will create a rich and creamy texture without being too heavy.
- Cheese Wisely: Use Gruyere cheese for its melting properties and Parmesan cheese for its salty, savory flavor.
- Spice it Right: Balance the sweetness of the sweet potatoes with savory spices like nutmeg, cinnamon, garlic, and onion. Consider adding fresh herbs like sage for a herbaceous note.
- Layering Technique: Layer the sweet potatoes, onions, and sauce evenly to ensure that everything cooks properly.
- Bake Covered, Then Uncovered: Bake the casserole covered with foil for the first 45 minutes to allow the sweet potatoes to cook through. Then, remove the foil and bake for an additional 15-20 minutes to allow the cheese to brown and bubble.
- Rest Before Serving: Let the casserole rest for 10-15 minutes before serving. This allows the sauce to thicken and the flavors to meld.
Why is consistent slicing thickness important for sweet potato scalloped casserole?
Consistent thickness, about 1/8 inch, ensures that the sweet potatoes cook evenly. Thicker, inconsistent slices can lead to some parts being undercooked while others are mushy.
What is the purpose of using both whole milk and heavy cream in the sauce?
Whole milk provides the necessary liquid for the starch in the sweet potatoes to gelatinize and thicken the sauce. Heavy cream adds richness and body, preventing the sauce from becoming watery.
Why is Gruyere cheese recommended over cheddar cheese for this casserole?
Gruyere cheese melts smoothly and creates a creamy texture, while cheddar cheese may not melt as smoothly and can separate.
What is the benefit of resting the casserole for 10-15 minutes after baking?
Resting the casserole allows the sauce to thicken slightly and the flavors to meld together, improving the overall taste and texture.
BEST Sweet Potato Scalloped Casserole
This Sweet Potato Scalloped Casserole recipe delivers a creamy and flavorful dish by understanding the science of starch gelatinization and balancing sweet and savory flavors. Thinly sliced sweet potatoes are layered in a rich cream sauce with Gruyere and Parmesan cheese, then baked to golden brown perfection.
Ingredients
Equipment
Method
- Preheat oven to 375°F (190°C). Grease a 9×13 inch baking dish.
- Thinly slice the sweet potatoes and onion using a mandoline or sharp knife. Ensure consistent thickness for even cooking.
- In a large saucepan, melt the butter over medium heat.
- Add the minced garlic and cook for about 30 seconds, until fragrant.
- Whisk in the flour and cook for 1-2 minutes, stirring constantly, to create a roux.
- Gradually whisk in the milk, ensuring there are no lumps. Bring to a simmer, stirring constantly.
- Reduce heat to low and simmer for 5-7 minutes, or until the sauce has thickened slightly.
- Stir in the heavy cream, nutmeg, cinnamon, salt, and pepper. Remove from heat.
- Arrange a layer of sweet potato slices in the prepared baking dish, overlapping slightly.
- Top with a layer of onion slices.
- Drizzle about 1/3 of the cream sauce over the sweet potatoes and onions.
- Sprinkle with 1/3 of the Gruyere and Parmesan cheeses, and 1/3 of the sage (if using).
- Repeat layers twice more, ending with a layer of cheese.
- Cover the baking dish with aluminum foil. Bake for 45 minutes.
- Remove the foil and bake for an additional 15-20 minutes, or until the sweet potatoes are tender and the cheese is golden brown and bubbly. A knife inserted into the sweet potatoes should meet little resistance.
- Let the casserole rest for 10-15 minutes before serving. This allows the sauce to thicken slightly and the flavors to meld.
Notes
For best results, ensure sweet potatoes are sliced uniformly to 1/8 inch thickness. Browning the butter before adding flour enhances the flavor. Resting the casserole after baking is crucial for the sauce to thicken. Store leftovers in the refrigerator for up to 3 days.


")