
The Quest for the Crunch: Decoding the Science of Crispy Chicken
The secret to truly crispy baked chicken, surprisingly, isn’t *just* about the breading. It’s about understanding the science of moisture and heat. First, we need to minimize moisture. Water turns to steam, which can prevent browning and make things soggy. This means patting the chicken dry *thoroughly* before breading is crucial. Second, high heat is essential. It rapidly evaporates surface moisture and allows the breading to dehydrate and crisp up. Think of it like this: the Maillard reaction (the browning of food) thrives in dry, hot environments. Finally, fat is your friend. A little bit of oil helps to conduct heat and contributes to that golden-brown, crispy texture we’re all after. However, too much oil will lead to a soggy mess, so restraint is key. This is why many Creamy Garlic Parmesan Crockpot Chicken recipes, while delicious, don’t yield crispy results without an additional step of pan-frying or broiling at the end.The Holy Grail of Chicken: The Ultimate Crispy Baked Chicken Tender Recipe
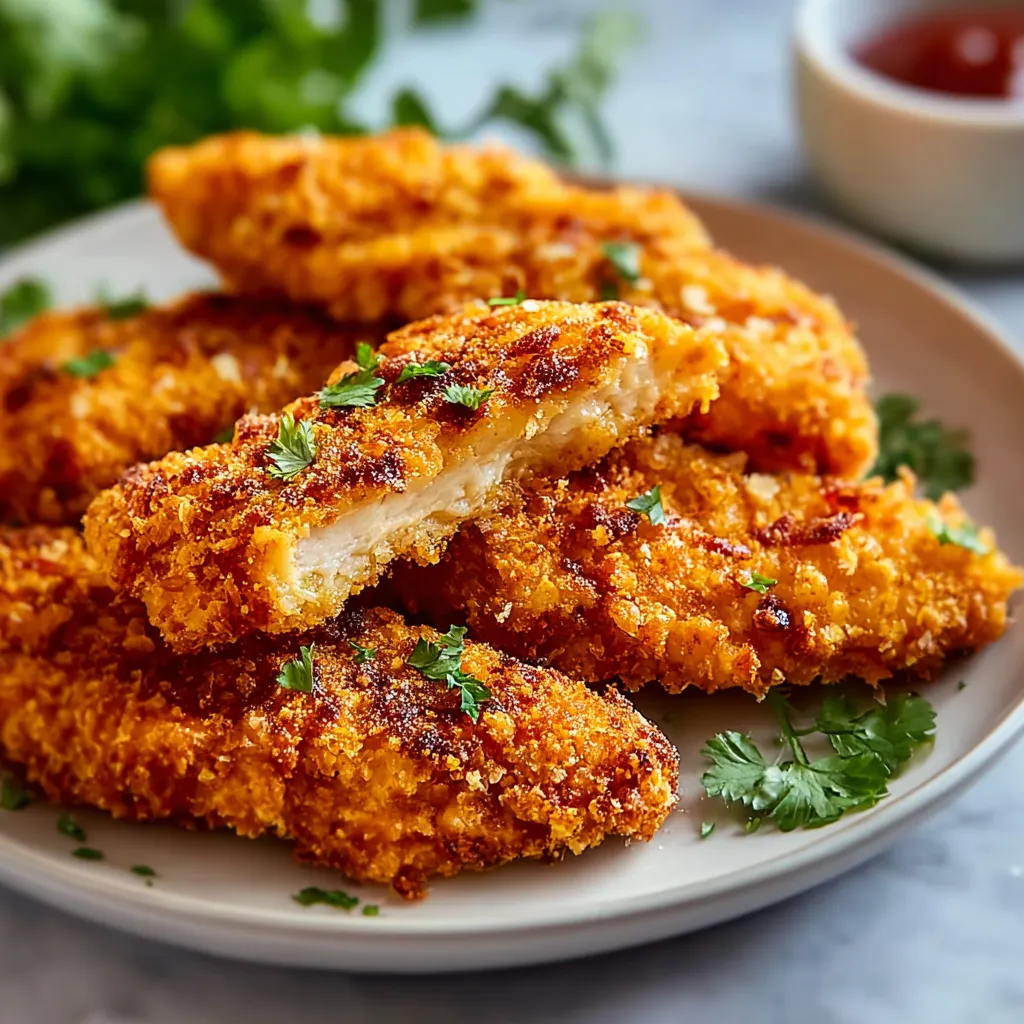
 This recipe is the culmination of my experiments, designed to give you the crispiest baked chicken tenders you’ve ever tasted.
Ingredients:
- 1.5 lbs boneless, skinless chicken tenders
- 1 cup all-purpose flour
- 2 large eggs, beaten
- 1.5 cups panko breadcrumbs
- 1/2 cup grated Parmesan cheese
- 2 tablespoons olive oil
- 1 teaspoon garlic powder
- 1 teaspoon onion powder
- 1 teaspoon paprika
- 1/2 teaspoon salt
- 1/4 teaspoon black pepper
Instructions:
- Prep the Chicken: Pat the chicken tenders dry with paper towels. This is CRUCIAL!
- Set up the Breading Station: In three separate shallow dishes, place the flour, the beaten eggs, and the panko breadcrumbs mixed with Parmesan cheese, olive oil, garlic powder, onion powder, paprika, salt, and pepper.
- Breading the Chicken: Dredge each chicken tender in the flour, shaking off any excess. Then, dip it in the beaten egg, making sure it’s fully coated. Finally, press it into the panko breadcrumb mixture, ensuring it’s evenly coated on all sides.
- Arrange on Baking Sheet: Place the breaded chicken tenders on a wire rack set inside a baking sheet. The wire rack is KEY because it allows air to circulate around the chicken, promoting even crisping.
- Bake: Bake in a preheated oven at 400°F (200°C) for 18-22 minutes, or until the chicken is cooked through and the breading is golden brown and crispy. Flip halfway through for even browning.
- Rest: Let the chicken tenders rest for a few minutes before serving. This allows the juices to redistribute, resulting in a more tender and flavorful result.
My Chicken Tender Confessions: The Investigation Begins
My journey to creating the perfect crispy baked chicken tender was not a straight line. My first few attempts were a disaster – soggy, pale, and utterly unappetizing. Like many of you, I initially thought the key was simply baking the chicken for a longer time. Boy, was I wrong!Phase 1: The Soggy Saga
I started with a standard breading recipe, flour, egg, and regular breadcrumbs, and baked the tenders directly on a baking sheet. The result? A soggy mess. The chicken released moisture during baking, and since it was sitting directly on the sheet, the bottom became incredibly soggy.Phase 2: The Wire Rack Revelation
Then, I had an “Aha!” moment. I remembered seeing chefs use wire racks for baking cookies to promote even browning. Could the same principle apply to chicken tenders? I tried again, placing the breaded chicken on a wire rack set inside a baking sheet. This was a *huge* improvement. The bottom of the tenders was no longer soggy, but they still weren’t as crispy as I wanted. They were just… baked.Phase 3: Panko Power
I realized that regular breadcrumbs weren’t providing enough texture or crunch. That’s when I discovered the magic of panko breadcrumbs. Their larger, coarser texture creates a much crispier coating. I also experimented with adding Parmesan cheese to the breadcrumb mixture, which added a delicious nutty flavor and helped with browning. I’ve used similar breading techniques when making Chicken Parmesan Casserole, but the baking process requires slight adjustments to achieve optimal crispness.Phase 4: The Oil Factor
Next, I considered the role of fat. While I wanted to avoid deep-frying, I knew that a little oil could help the breading crisp up. I tried two approaches: drizzling the chicken tenders with olive oil before baking and mixing olive oil directly into the breadcrumb mixture. The latter proved to be more effective, ensuring that the breadcrumbs were evenly coated with a thin layer of fat.Phase 5: Temperature Tango
Finally, I played around with oven temperatures. I found that baking at 400°F (200°C) struck the perfect balance – high enough to promote crisping but not so high that the breading burned before the chicken was cooked through. I learned to avoid using lower temperatures that are commonly used for slow cooker recetas, especially when I am looking for quick Honey Garlic Chicken Heaven that requires a good sear to enhance the flavor. After all, some of my favorite crockpot meals are not easily converted to baking recipes without compromises. Even crockpot meals 4 hours or less often rely on moisture and longer cooking times, which is the enemy of crispy.The Foolproof Formula: How to Make Crispy Baked Chicken Tenders Every Time
After numerous trials and tribulations, I’ve distilled the process down to a foolproof method. Follow these steps, and you’ll be enjoying crispy, golden-brown chicken tenders in no time.- Dry, Dry, Dry: Pat your chicken tenders as dry as humanly possible with paper towels. Moisture is the enemy of crispiness.
- Wire Rack is Your Friend: Always bake your chicken tenders on a wire rack set inside a baking sheet. This allows air to circulate, preventing the bottom from becoming soggy.
- Panko Power: Use panko breadcrumbs for maximum crunch. Regular breadcrumbs just don’t cut it.
- Parmesan Boost: Mix grated Parmesan cheese into your breadcrumb mixture for added flavor and browning.
- Oil Infusion: Mix a little bit of olive oil into your breadcrumb mixture to help the breading crisp up and turn golden brown.
- High Heat: Bake at 400°F (200°C) for optimal crisping.
- Patience is a Virtue: Resist the urge to overcrowd the baking sheet. Work in batches if necessary to ensure that each tender has enough space to crisp up properly.
What is the key to achieving crispy baked chicken tenders?
The key lies in minimizing moisture, using high heat, and incorporating a little bit of oil. Patting the chicken dry, using a wire rack, and baking at 400°F (200°C) are crucial.
Why is a wire rack important when baking chicken tenders?
A wire rack allows air to circulate around the chicken, preventing the bottom from becoming soggy and promoting even crisping.
What type of breadcrumbs are recommended for the crispiest chicken tenders?
Panko breadcrumbs are recommended because their larger, coarser texture creates a much crispier coating compared to regular breadcrumbs.
How does adding oil contribute to crispy baked chicken tenders?
A little bit of olive oil mixed into the breadcrumb mixture helps the breading to crisp up and turn golden brown by conducting heat.
Crispy Baked Chicken Tenders
Achieve perfectly crispy baked chicken tenders without deep-frying by focusing on minimizing moisture, using high heat, and incorporating a little oil. This recipe uses panko breadcrumbs and a wire rack for optimal crispness.
Ingredients
Equipment
Method
- Pat the chicken tenders dry with paper towels.
- In three separate shallow dishes, place the flour, the beaten eggs, and the panko breadcrumbs mixed with Parmesan cheese, olive oil, garlic powder, onion powder, paprika, salt, and pepper.
- Dredge each chicken tender in the flour, shaking off any excess.
- Dip it in the beaten egg, making sure it’s fully coated.
- Press it into the panko breadcrumb mixture, ensuring it’s evenly coated on all sides.
- Place the breaded chicken tenders on a wire rack set inside a baking sheet.
- Bake in a preheated oven at 400°F (200°C) for 18-22 minutes, or until the chicken is cooked through and the breading is golden brown and crispy. Flip halfway through for even browning.
- Let the chicken tenders rest for a few minutes before serving.
Notes
Pat the chicken tenders as dry as possible. Always bake on a wire rack for even crisping. Use panko breadcrumbs for maximum crunch. Mix Parmesan cheese and olive oil into the breadcrumb mixture. Bake at 400°F (200°C) for optimal results. Don’t overcrowd the baking sheet. You can add hot honey sauce after baking or incorporate flavors from Cheesy Garlic Chicken Wraps into the breading for variations.


")