I remember the first time I tried to bake chicken thighs – they came out dry, rubbery, and utterly disappointing. It felt like a culinary crime scene! I was determined to figure out how to make them juicy and flavorful every single time, and after countless attempts, I’ve finally cracked the code. Now, I’m beyond excited to share my foolproof method for making the most succulent Boneless Skinless Chicken Thighs in Oven. Today, I’m sharing all my secrets for the most amazing Boneless Skinless Chicken Thighs in Oven you’ll ever make!
Why Boneless Skinless Chicken Thighs Are a Weeknight Hero

Let’s talk about chicken thighs. Specifically, boneless, skinless chicken thighs. These little gems are a game-changer in the kitchen, and here’s why:
- They’re incredibly forgiving. Unlike chicken breasts, chicken thighs are much more resistant to drying out. That extra bit of fat keeps them moist and juicy, even if you accidentally overcook them by a few minutes (we’ve all been there!).
- They’re packed with flavor. Dark meat has a richer, more intense flavor than white meat. This means you don’t have to work as hard to create a delicious dish.
- They’re budget-friendly. Chicken thighs are generally less expensive than chicken breasts, making them a great option for feeding a family on a budget.
- They’re versatile. You can bake them, grill them, pan-fry them, or even slow-cook them. They’re incredibly adaptable to different cuisines and flavor profiles.
- They cook quickly. Boneless, skinless chicken thighs cook much faster than bone-in, skin-on thighs, making them perfect for busy weeknights.
The Secret to Juicy Chicken Thighs: Brining (Optional, But Recommended!)
Okay, let’s talk about brining. It might seem like an extra step, but I promise it’s worth it! Brining is simply soaking the chicken in a saltwater solution. This does two things:
- It infuses the chicken with moisture, making it even juicier.
- It seasons the chicken from the inside out, ensuring that every bite is flavorful.
If you have the time, I highly recommend brining your chicken thighs for at least 30 minutes, or even up to 2 hours. Here’s a simple brining recipe:
Simple Chicken Thigh Brine
- 4 cups water
- 1/4 cup kosher salt
- 1/4 cup sugar
- Optional: Garlic cloves, peppercorns, bay leaf
- Combine the water, salt, and sugar in a large bowl or container. Stir until the salt and sugar are dissolved.
- Add any optional seasonings you like.
- Submerge the chicken thighs in the brine. Make sure they’re completely covered.
- Cover the bowl and refrigerate for at least 30 minutes, or up to 2 hours.
- Remove the chicken from the brine and pat it dry with paper towels before proceeding with the recipe.
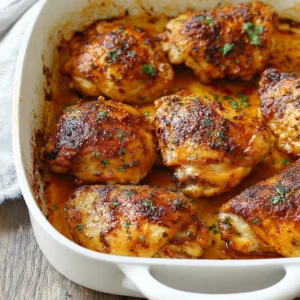
The Ultimate Oven-Baked Boneless Skinless Chicken Thighs Recipe
Alright, let’s get to the good stuff! This is my go-to recipe for oven-baked boneless, skinless chicken thighs. It’s simple, flavorful, and always delivers juicy, delicious results.
Ingredients:
- 1.5 – 2 pounds boneless, skinless chicken thighs
- 1 tablespoon olive oil
- 1 teaspoon paprika
- 1 teaspoon garlic powder
- 1/2 teaspoon onion powder
- 1/2 teaspoon dried thyme
- 1/4 teaspoon black pepper
- 1/4 teaspoon salt (or more, to taste)
- Optional: 1 tablespoon lemon juice, fresh herbs (such as rosemary or parsley)
Equipment:
- Baking Sheet
- Aluminum Foil (optional, for easier cleanup)
- Mixing Bowl
- Meat Thermometer
Instructions:
- Preheat your oven to 400°F (200°C). This high temperature helps to create a nice sear on the outside of the chicken while keeping the inside juicy.
- Prepare the chicken. If you brined the chicken, remove it from the brine and pat it dry with paper towels. If you didn’t brine it, simply pat the chicken dry with paper towels. This is crucial for getting a good sear.
- Mix the seasonings. In a small bowl, combine the paprika, garlic powder, onion powder, dried thyme, black pepper, and salt.
- Season the chicken. Drizzle the olive oil over the chicken thighs, making sure to coat them evenly. Then, sprinkle the seasoning mixture over the chicken, pressing it gently into the meat to help it adhere. Make sure every nook and cranny is covered!
- Arrange the chicken on a baking sheet. Line a baking sheet with aluminum foil for easier cleanup (optional). Place the chicken thighs on the baking sheet, making sure they’re not overcrowded. You want them to have a little space around them so they can brown properly.
- Bake the chicken. Place the baking sheet in the preheated oven and bake for 20-25 minutes, or until the chicken reaches an internal temperature of 165°F (74°C). Use a meat thermometer to check the temperature in the thickest part of the thigh.
- Optional: Broil for extra crispiness. If you want the chicken to be extra crispy, you can broil it for the last 1-2 minutes of cooking. Keep a close eye on it to prevent it from burning!
- Let the chicken rest. Remove the chicken from the oven and let it rest for 5-10 minutes before serving. This allows the juices to redistribute, resulting in even juicier chicken.
- Serve and enjoy! Garnish with fresh herbs, if desired, and serve with your favorite sides.
Variations and Flavor Boosts
This recipe is a great starting point, but feel free to experiment with different flavors and variations! Here are a few ideas to get you started:
- Lemon Herb: Add 1 tablespoon of lemon juice and 1 teaspoon of dried rosemary or oregano to the seasoning mixture. A squeeze of fresh lemon juice after cooking brightens everything.
- Spicy: Add 1/2 teaspoon of cayenne pepper or red pepper flakes to the seasoning mixture.
- BBQ: Brush the chicken with your favorite BBQ sauce during the last 5 minutes of cooking.
- Garlic Parmesan: Sprinkle the chicken with grated Parmesan cheese during the last 5 minutes of cooking.
- Honey Mustard: Whisk together 2 tablespoons of honey, 2 tablespoons of Dijon mustard, and 1 tablespoon of olive oil. Brush the mixture over the chicken during the last 10 minutes of cooking.
If you’re looking for a complete meal, consider pairing these oven-baked chicken thighs with roasted vegetables like broccoli, carrots, or sweet potatoes. Or, serve them over a bed of rice or quinoa with a side salad.
Sometimes, I get a craving for something a little more indulgent, and that’s when I turn to SMOTHERED CHICKEN. It’s a total comfort food classic!
For a quick and easy lunch option, these chicken thighs are fantastic in CHICKEN SLIDERS. They’re perfect for meal prepping and packing for work or school.
And when I’m in the mood for pasta, I love using these chicken thighs in GARLIC BUTTER CHICKEN ROTINI. The juicy chicken pairs perfectly with the creamy sauce and tender pasta.
For a sweet and savory twist, try using this method with the flavors of HONEY PEPPER CHICKEN or HONEY GARLIC CHICKEN. The sweetness of the honey complements the richness of the chicken thighs beautifully.
Don’t underestimate the power of a slow cooker! If you want to set it and forget it, check out this recipe for Crockpot Chicken Thighs. It’s surprisingly easy to get crispy skin, even in a slow cooker.
Success Tips for Perfect Oven-Baked Chicken Thighs
Okay, friend, I want to make sure you knock this recipe out of the park! Here are my top tips for guaranteed success:
- Don’t overcrowd the pan. Give the chicken thighs plenty of space on the baking sheet so they can brown properly. If you’re making a large batch, use two baking sheets.
- Use a meat thermometer. This is the best way to ensure that the chicken is cooked through without being overcooked. Insert the thermometer into the thickest part of the thigh, and make sure it reaches 165°F (74°C).
- Let the chicken rest. This is crucial for juicy chicken! Letting the chicken rest for 5-10 minutes allows the juices to redistribute, resulting in a more tender and flavorful result.
- Don’t be afraid to experiment with seasonings. This recipe is a blank canvas! Feel free to try different herbs, spices, and marinades to create your own signature flavor.
- Pat the chicken dry. Before seasoning, pat the chicken thighs dry with paper towels. This helps them to brown better in the oven.
Make-Ahead and Storage Instructions
Good news! You can easily prepare these chicken thighs in advance. Here’s how:
- Make-Ahead: Season the chicken thighs up to 24 hours in advance and store them in the refrigerator. This allows the flavors to meld together even more.
- Storage: Cooked chicken thighs can be stored in an airtight container in the refrigerator for up to 3-4 days.
- Reheating: Reheat the chicken thighs in the oven at 350°F (175°C) until heated through, or in the microwave.
- Freezing: Cooked chicken thighs can be frozen for up to 2-3 months. Wrap them tightly in plastic wrap and then place them in a freezer-safe bag or container. Thaw overnight in the refrigerator before reheating.
Conclusion
There you have it! My ultimate guide to making the most delicious, juicy, and flavorful boneless skinless chicken thighs in the oven. I hope you’ll give this recipe a try and let me know what you think. With a few simple steps and a little bit of love, you can create a restaurant-quality meal that everyone will enjoy. Happy cooking!
Why are boneless, skinless chicken thighs a good choice for weeknight meals?
Boneless, skinless chicken thighs are forgiving, flavorful, budget-friendly, versatile, and cook quickly, making them perfect for busy weeknights.
Is brining necessary for juicy chicken thighs?
Brining is optional but recommended. It infuses the chicken with moisture and seasons it from the inside out, resulting in even juicier and more flavorful chicken.
What is the ideal internal temperature for cooked chicken thighs?
The chicken thighs should reach an internal temperature of 165°F (74°C) when measured with a meat thermometer in the thickest part of the thigh.
How long can cooked chicken thighs be stored?
Cooked chicken thighs can be stored in an airtight container in the refrigerator for up to 3-4 days, or frozen for up to 2-3 months.

Juicy Oven-Baked Boneless Skinless Chicken Thighs
![]()
This recipe delivers perfectly juicy and flavorful boneless, skinless chicken thighs every time. Brining is optional but recommended for extra moisture and flavor. A simple spice rub and high oven temperature ensure a delicious sear and tender interior.
-
Baking Sheet
-
Aluminum foil (optional)
-
Mixing bowl
-
Meat thermometer
-
Paper towels
-
Large bowl or container (for brining, if using)
-
Whisk (for brining, if using)
- 1.5 – 2 pounds boneless, skinless chicken thighs
- 1 tablespoon olive oil
- 1 teaspoon paprika
- 1 teaspoon garlic powder
- ½ teaspoon onion powder
- ½ teaspoon dried thyme
- ¼ teaspoon black pepper
- ¼ teaspoon salt or more, to taste
- 1 tablespoon lemon juice optional
- Fresh herbs such as rosemary or parsley, optional
- 4 cups water for brining, if using
- ¼ cup kosher salt for brining, if using
- ¼ cup sugar for brining, if using
- Garlic cloves optional, for brining
- Bay leaf optional, for brining
-
Preheat your oven to 400°F (200°C).
-
If brining the chicken, combine water, salt, sugar, and optional seasonings in a large bowl. Stir until dissolved. Submerge chicken thighs in the brine, ensuring they are completely covered. Refrigerate for 30 minutes to 2 hours. Remove chicken and pat dry.
-
Pat the chicken thighs dry with paper towels.
-
In a small bowl, combine paprika, garlic powder, onion powder, dried thyme, black pepper, and salt.
-
Drizzle olive oil over the chicken thighs, coating evenly.
-
Sprinkle the seasoning mixture over the chicken, pressing it gently into the meat to help it adhere. Ensure every part is covered.
-
Line a baking sheet with aluminum foil (optional). Place the chicken thighs on the baking sheet, ensuring they’re not overcrowded.
-
Bake for 20-25 minutes, or until the chicken reaches an internal temperature of 165°F (74°C). Use a meat thermometer to check the temperature in the thickest part of the thigh.
-
If desired, broil for the last 1-2 minutes for extra crispiness, keeping a close eye to prevent burning.
-
Remove the chicken from the oven and let it rest for 5-10 minutes before serving.
-
Garnish with fresh herbs, if desired, and serve with your favorite sides.
For optimal results, use a meat thermometer to ensure the chicken is cooked through without being overcooked. Don’t overcrowd the baking sheet; use two if necessary. Resting the chicken after cooking is crucial for juicy results. Store cooked chicken in an airtight container in the refrigerator for up to 3-4 days, or freeze for up to 2-3 months. Season the chicken up to 24 hours in advance for enhanced flavor. Experiment with different herbs, spices, and marinades to customize the flavor profile. For a lemon herb variation, add lemon juice and rosemary. For a spicy version, add cayenne pepper. Brushing with BBQ sauce or honey mustard during the last few minutes of cooking adds extra flavor.