
Unlocking the Secrets: The Science Behind the Bird
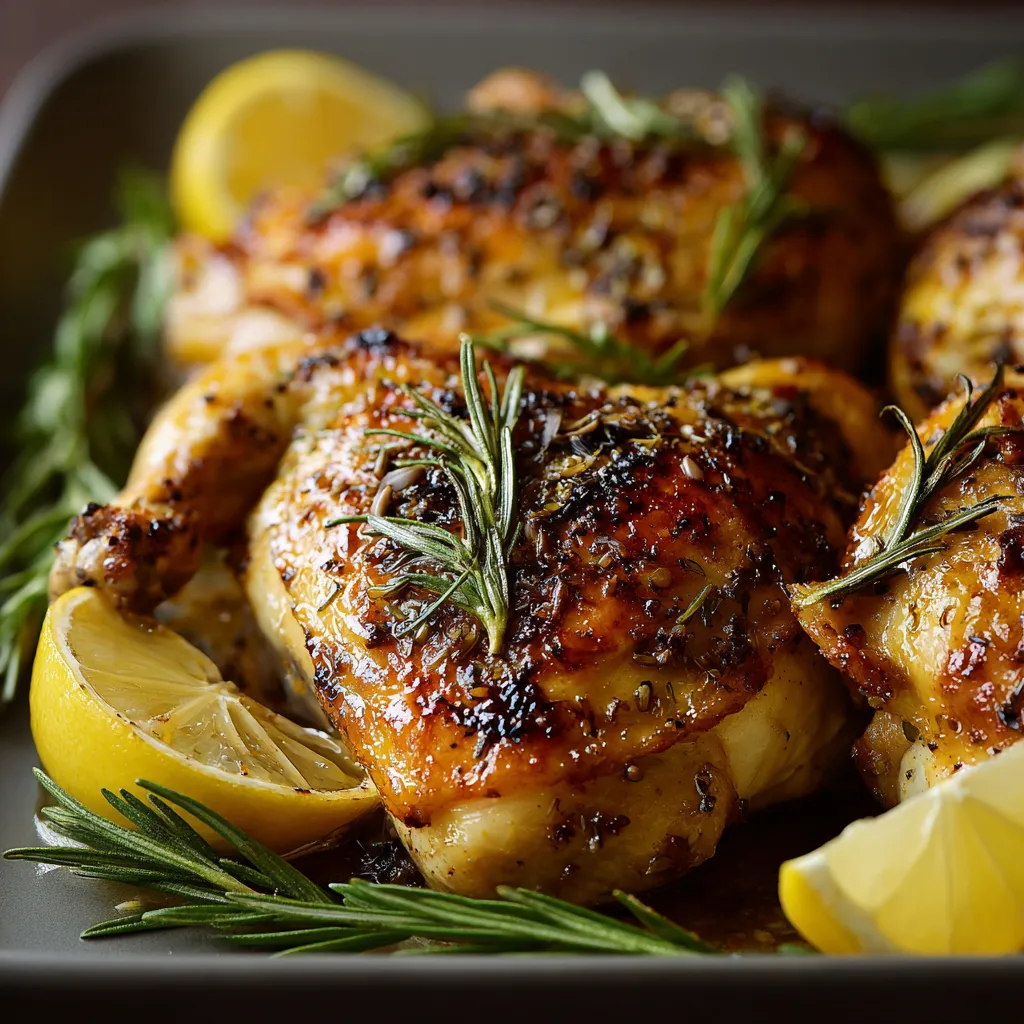
Roasting a chicken might seem straightforward, but a lot of science is at play. The key to crispy skin lies in removing moisture. Dry skin before roasting encourages browning and crisping through the Maillard reaction – a chemical reaction between amino acids and reducing sugars that gives browned food its distinctive flavor. Spatchcocking, or butterflying, the chicken significantly reduces cooking time and ensures even cooking, as the bird is flattened, allowing for more surface area exposure to heat. Lemon and rosemary, being oil-soluble, infuse the chicken with flavor when combined with fat (like olive oil or rendered chicken fat) and applied under the skin. The acid in the lemon also helps tenderize the meat, while the rosemary’s volatile oils contribute to its distinct aroma and flavor. Temperature is also crucial; a higher starting temperature kickstarts the browning process, while a slightly lower temperature finishes cooking the chicken through without burning the skin. Finally, resting the chicken after roasting allows the juices to redistribute, resulting in a more tender and flavorful bird.The Recipe: Rosemary Lemon Split Roast Chicken
 Here’s a detailed recipe to guide you towards rosemary lemon roast chicken perfection:
Ingredients:
- 1 whole chicken (about 3-4 lbs)
- 2 lemons, one zested and juiced, one sliced
- 4 sprigs fresh rosemary, roughly chopped
- 4 cloves garlic, minced
- 1/4 cup olive oil
- 2 tablespoons kosher salt
- 1 teaspoon black pepper
- 1/2 teaspoon red pepper flakes (optional)
- 1 tablespoon butter, softened
- 1/4 cup dry white wine (optional)
Equipment:
- Kitchen shears or sharp knife
- Roasting pan with rack
- Meat thermometer
Instructions:
- Prepare the Chicken: Pat the chicken completely dry with paper towels, inside and out. This is critical for crispy skin.
- Spatchcock the Chicken: Using kitchen shears or a sharp knife, remove the backbone of the chicken. Start by cutting along one side of the backbone, then the other. Open the chicken like a book and press down firmly on the breastbone to flatten it.
- Make the Rosemary Lemon Marinade: In a bowl, combine the lemon zest, lemon juice, chopped rosemary, minced garlic, olive oil, salt, pepper, and red pepper flakes (if using).
- Marinate the Chicken: Gently loosen the skin of the chicken breast and thighs with your fingers, being careful not to tear it. Rub half of the rosemary lemon marinade under the skin, ensuring it’s evenly distributed. Rub the remaining marinade all over the outside of the chicken.
- Refrigerate (Optional): For best results, refrigerate the chicken for at least 2 hours, or up to overnight. If marinating for longer than 2 hours, reduce the amount of lemon juice slightly to prevent the chicken from becoming too acidic.
- Preheat the Oven: Preheat your oven to 450°F (232°C).
- Prepare the Roasting Pan: Place the sliced lemons in the bottom of the roasting pan. This will elevate the chicken slightly and add flavor to the drippings.
- Roast the Chicken: Place the spatchcocked chicken on the roasting rack, skin-side up.
- Initial Roast: Roast the chicken at 450°F (232°C) for 20 minutes to promote browning.
- Reduce Heat: Reduce the oven temperature to 375°F (190°C).
- Continue Roasting: Continue roasting for another 30-40 minutes, or until a meat thermometer inserted into the thickest part of the thigh registers 165°F (74°C).
- Baste (Optional): During the last 15 minutes of cooking, baste the chicken with the pan drippings, or a mixture of melted butter and white wine.
- Rest: Remove the chicken from the oven and let it rest for 10-15 minutes before carving. This allows the juices to redistribute, resulting in a more tender and flavorful bird.
- Carve and Serve: Carve the chicken and serve with the roasted lemons and pan drippings.
My Chicken Chronicle: A Culinary Investigation
My journey to perfecting Rosemary Lemon Split Roast Chicken was not without its bumps. My first few attempts were a disaster. The skin was either pale and flabby, or burnt to a crisp, while the meat was often dry and unevenly cooked. Like many of you, I initially thought that roasting a chicken was simply a matter of throwing it in the oven and hoping for the best. I was so wrong.The Pale and Flabby Fiasco
Initially, I was using a lower oven temperature, thinking it would result in more even cooking. The result? A chicken that looked like it had spent the day at the spa, not in a fiery oven. The skin was pale, rubbery, and utterly unappetizing. The meat, while cooked through, lacked that desirable roasted flavor.The Burning Question: High Heat vs. Low Heat
Then, I swung completely in the opposite direction. I cranked up the oven temperature, convinced that high heat was the answer to crispy skin. While the skin did get nice and brown, it also quickly turned black in some areas, while the interior remained stubbornly undercooked. I realized that heat management was more nuanced than I thought.Spatchcocking Salvation
The “Aha!” moment came when I stumbled upon the technique of spatchcocking, or butterflying, the chicken. Flattening the bird not only drastically reduced cooking time but also ensured that the chicken cooked more evenly. This single technique was a game-changer. It allowed for more consistent browning and juicier meat.The Lemon Rosemary Revelation
I had always loved the combination of lemon and rosemary, but I wasn’t maximizing its potential. Simply stuffing a lemon inside the cavity wasn’t enough. It was only when I started loosening the skin and rubbing the marinade directly onto the meat that I truly unlocked the flavors. I also experimented with adding a touch of softened butter under the skin, which further enhanced the richness and flavor. I even tried different variations of the marinade, sometimes adding Dijon mustard for a tangy kick, or a pinch of red pepper flakes for a subtle heat. For a different take, try exploring a Lemon Chicken Romano sometime.The Resting Ritual
Finally, I learned the importance of resting the chicken after roasting. Impatient to dig in, I used to carve the chicken immediately after it came out of the oven, resulting in a flood of juices escaping and drier meat. By allowing the chicken to rest for 10-15 minutes, the juices redistributed, resulting in a much more tender and flavorful bird. It also gave me a chance to prepare a simple pan sauce using the drippings, which added another layer of flavor to the dish. It is amazing how different herbs and spices can change the overall flavor profile. For example, the Rosemary Apple Cider Chicken uses rosemary to create a sweeter, more autumnal flavor profile.The Art of the Bird: A Foolproof Technique
Here’s a step-by-step guide to achieving the ultimate Rosemary Lemon Split Roast Chicken:- Dry the Chicken Thoroughly: Pat the chicken dry, inside and out, with paper towels. This is non-negotiable for crispy skin.
- Spatchcock the Chicken: Remove the backbone to flatten the chicken for even cooking.
- Loosen the Skin: Gently loosen the skin of the breast and thighs to create pockets for the marinade.
- Marinate Generously: Rub the rosemary lemon marinade under the skin and all over the outside of the chicken.
- Initial High Heat: Start roasting at 450°F (232°C) for 20 minutes to promote browning.
- Reduce Heat and Roast: Reduce the oven temperature to 375°F (190°C) and continue roasting until the internal temperature reaches 165°F (74°C).
- Rest Before Carving: Let the chicken rest for 10-15 minutes before carving to allow the juices to redistribute.
- Optional Basting: Basting during the final 15 minutes can further enhance your flavors and crispiness.
Why is it important to dry the chicken thoroughly before roasting?
Patting the chicken completely dry with paper towels, inside and out, is critical for achieving crispy skin. Removing moisture encourages browning and crisping through the Maillard reaction.
What is “spatchcocking” and why is it beneficial for roasting chicken?
Spatchcocking, or butterflying, is the process of removing the backbone of the chicken and flattening it. This technique reduces cooking time and ensures even cooking because it exposes more surface area to the heat.
At what temperature should I roast the chicken, and for how long?
Start by roasting the chicken at 450°F (232°C) for 20 minutes to promote browning. Then, reduce the oven temperature to 375°F (190°C) and continue roasting for another 30-40 minutes, or until a meat thermometer inserted into the thickest part of the thigh registers 165°F (74°C).
Why is it important to let the chicken rest after roasting?
Resting the chicken for 10-15 minutes after roasting allows the juices to redistribute throughout the meat, resulting in a more tender and flavorful bird.
Perfect Rosemary Lemon Split Chicken
Ingredients
Equipment
Method
- Preheat the oven to 450°F (232°C).
- Pat the chicken completely dry with paper towels, inside and out.
- Using kitchen shears or a sharp knife, remove the backbone of the chicken. Open the chicken like a book and press down firmly on the breastbone to flatten it.
- In a bowl, combine the lemon zest, lemon juice, chopped rosemary, minced garlic, olive oil, salt, pepper, and red pepper flakes (if using).
- Gently loosen the skin of the chicken breast and thighs with your fingers, being careful not to tear it. Rub half of the rosemary lemon marinade under the skin, ensuring it’s evenly distributed. Rub the remaining marinade all over the outside of the chicken.
- For best results, refrigerate the chicken for at least 2 hours, or up to overnight. If marinating for longer than 2 hours, reduce the amount of lemon juice slightly to prevent the chicken from becoming too acidic.
- Place the sliced lemons in the bottom of the roasting pan.
- Place the spatchcocked chicken on the roasting rack, skin-side up.
- Roast the chicken at 450°F (232°C) for 20 minutes to promote browning.
- Reduce the oven temperature to 375°F (190°C).
- Continue roasting for another 30-40 minutes, or until a meat thermometer inserted into the thickest part of the thigh registers 165°F (74°C).
- During the last 15 minutes of cooking, baste the chicken with the pan drippings, or a mixture of melted butter and white wine (optional).
- Remove the chicken from the oven and let it rest for 10-15 minutes before carving.
- Carve the chicken and serve with the roasted lemons and pan drippings.


")