
Decoding the Deliciousness: The Science Behind the Flavors
The magic behind Honey Butter Garlic Chicken and Rice isn’t just about throwing ingredients together; it’s about understanding how they interact on a molecular level. The Maillard reaction, occurring between the amino acids in the chicken and the reducing sugars in the honey, is crucial for that beautiful browning and deep savory flavor. Browning the chicken properly before adding the other ingredients is non-negotiable, or you won’t develop that depth of flavor. The garlic’s allicin content (that pungent compound responsible for its distinctive flavor) is maximized when it’s freshly minced or pressed. Heat transforms allicin, mellowing its intensity and creating a sweeter, more nuanced garlic flavor. The butter, of course, carries these flavors and adds richness, while also contributing to the overall texture of the dish. Emulsifying the honey, butter, and garlic creates a cohesive sauce that clings beautifully to both the chicken and the rice. Finally, the rice cooks in the chicken broth, absorbing all of these delicious flavors and becoming incredibly aromatic.The Ultimate Honey Butter Garlic Chicken and Rice Recipe
 This recipe is designed to be straightforward and yield consistently delicious results. Get ready for a flavor explosion!
Ingredients:
- Chicken: 1.5 lbs boneless, skinless chicken thighs, cut into 1-inch pieces
- Rice: 1.5 cups long-grain white rice, rinsed
- Chicken Broth: 3 cups low-sodium chicken broth
- Honey: 1/4 cup
- Butter: 4 tablespoons unsalted butter
- Garlic: 6 cloves, minced
- Soy Sauce: 2 tablespoons low-sodium soy sauce
- Olive Oil: 1 tablespoon
- Salt and Pepper: To taste
- Optional Garnish: Chopped fresh parsley or green onions
Instructions:
- Prepare the Chicken: Season the chicken pieces generously with salt and pepper.
- Sear the Chicken: Heat olive oil in a large skillet or Dutch oven over medium-high heat. Add the chicken in a single layer (work in batches if necessary) and sear for 3-4 minutes per side, until golden brown. Remove the chicken from the skillet and set aside. Don’t overcrowd the pan!
- Sauté the Garlic: Reduce heat to medium. Add the butter to the skillet and let it melt. Add the minced garlic and sauté for 1-2 minutes, until fragrant. Be careful not to burn the garlic.
- Create the Sauce: Whisk in the honey and soy sauce into the garlic butter. Bring to a simmer and cook for 1 minute, stirring constantly.
- Combine Ingredients: Add the rinsed rice and chicken broth to the skillet. Stir to combine.
- Return the Chicken: Place the seared chicken on top of the rice mixture.
- Simmer and Cook: Bring the mixture to a boil, then reduce heat to low, cover, and simmer for 20-25 minutes, or until the rice is cooked through and the liquid is absorbed. Do NOT lift the lid during this time!
- Rest and Fluff: Remove from heat and let stand, covered, for 5-10 minutes. Fluff the rice with a fork.
- Garnish and Serve: Garnish with chopped fresh parsley or green onions, if desired. Serve immediately.
Unlocking the Flavor Code: My Culinary Investigation
My journey to perfecting Honey Butter Garlic Chicken and Rice was not without its hiccups. Like many of you, I initially thought it was just a matter of throwing everything in a pan and hoping for the best. My first few attempts were a disaster – the rice was either mushy or undercooked, the chicken was bland, and the sauce was either too sweet or too salty. But I was determined to crack the code.The Mushy Rice Debacle
My first challenge was the rice. It kept turning out mushy. I tried different types of rice – short-grain, medium-grain – but nothing seemed to work. Then, I had an “Aha!” moment: rinsing the rice! Rinsing removes excess starch, preventing the rice from sticking together and becoming gummy. This simple step made a world of difference. Also, I realized that using the correct liquid ratio was crucial. Too much liquid, and you end up with a soggy mess. Not enough, and you’re left with crunchy, undercooked rice.The Bland Chicken Blues
Next, I tackled the chicken. It was consistently lacking in flavor. I tried marinating it, but the results were inconsistent. Then, I realized the key was in the searing. Browning the chicken properly before adding it to the rice mixture not only improved its texture but also created a much richer, more savory flavor. The Maillard reaction, as I mentioned earlier, is your best friend here. Don’t skip this step!The Sauce Conundrum
Finally, the sauce. It was either too sweet, too salty, or just plain boring. I experimented with different ratios of honey, soy sauce, and garlic. I found that using low-sodium soy sauce allowed me to control the saltiness better. And the key to a balanced sauce was to sauté the garlic in butter first, which mellowed its intensity and created a more complex flavor profile. I also discovered that a touch of acidity, like a squeeze of lemon juice at the end, could brighten up the flavors and add a nice zing. It’s also very important to not burn the garlic!Honey Butter Garlic Chicken and Rice: The Foolproof Technique
After numerous experiments and taste tests, I’ve distilled the process down to a foolproof technique. Follow these steps, and you’ll be enjoying perfectly cooked Honey Butter Garlic Chicken and Rice every time.- Rinse the Rice: Rinse the rice thoroughly under cold water until the water runs clear. This removes excess starch and prevents mushiness.
- Sear the Chicken: Sear the chicken pieces in a hot skillet until golden brown. This develops a deep, savory flavor.
- Sauté the Garlic: Sauté the minced garlic in butter until fragrant. Be careful not to burn it.
- Use Low-Sodium Soy Sauce: This allows you to control the saltiness of the sauce.
- Simmer, Don’t Stir: Once you’ve combined all the ingredients, bring to a boil, then reduce heat to low, cover, and simmer without stirring. This ensures that the rice cooks evenly.
- Let it Rest: After cooking, let the dish stand, covered, for 5-10 minutes. This allows the rice to absorb any remaining liquid and become perfectly fluffy.
Why is it important to sear the chicken before adding it to the rice?
Searing the chicken develops a deep, savory flavor through the Maillard reaction and improves its texture. Skipping this step can result in bland chicken.
Why should I rinse the rice before cooking it in this recipe?
Rinsing the rice removes excess starch, which prevents the rice from sticking together and becoming mushy during the cooking process.
What is the key to preventing the garlic from burning when sautéing it?
Sauté the minced garlic in butter over medium heat for only 1-2 minutes, until fragrant. Watch it carefully and reduce the heat if needed to prevent burning, as burnt garlic will make the dish bitter.
Why does the recipe call for low-sodium soy sauce?
Using low-sodium soy sauce allows you to better control the saltiness of the sauce and prevents the dish from becoming too salty.
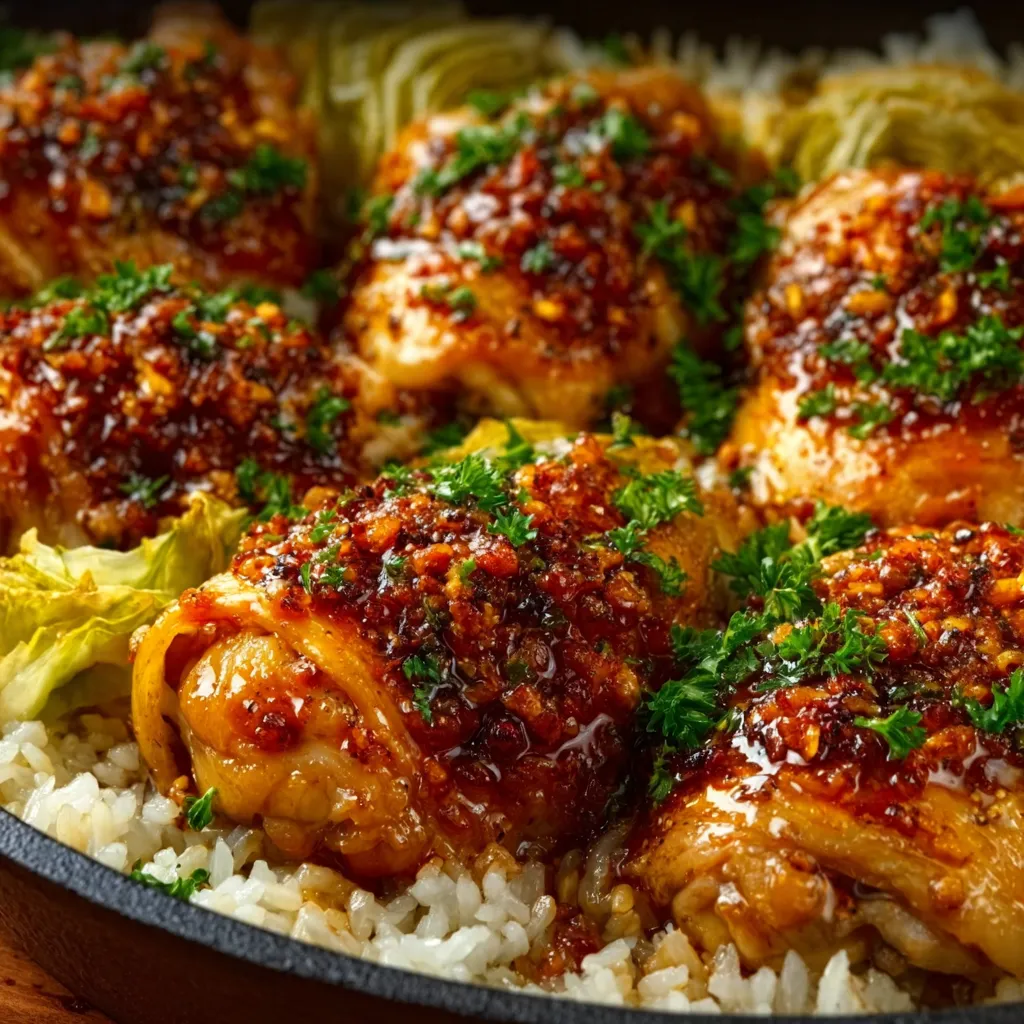
Irresistible Honey Butter Garlic Chicken and Rice
This one-pan dish combines the sweet, savory, and rich flavors of honey, butter, and garlic with tender chicken and perfectly cooked rice. Browning the chicken before simmering is key to developing a depth of flavor, while rinsing the rice ensures a fluffy texture. This recipe is designed to be straightforward and yield consistently delicious results.
Ingredients
Equipment
Method
- Season the chicken pieces generously with salt and pepper.
- Heat olive oil in a large skillet or Dutch oven over medium-high heat.
- Add the chicken in a single layer (work in batches if necessary) and sear for 3-4 minutes per side, until golden brown. Remove the chicken from the skillet and set aside.
- Reduce heat to medium. Add the butter to the skillet and let it melt.
- Add the minced garlic and sauté for 1-2 minutes, until fragrant. Be careful not to burn the garlic.
- Whisk in the honey and soy sauce into the garlic butter. Bring to a simmer and cook for 1 minute, stirring constantly.
- Add the rinsed rice and chicken broth to the skillet. Stir to combine.
- Place the seared chicken on top of the rice mixture.
- Bring the mixture to a boil, then reduce heat to low, cover, and simmer for 20-25 minutes, or until the rice is cooked through and the liquid is absorbed. Do NOT lift the lid during this time!
- Remove from heat and let stand, covered, for 5-10 minutes.
- Fluff the rice with a fork.
- Garnish with chopped fresh parsley or green onions, if desired. Serve immediately.
Notes
Rinsing the rice removes excess starch, preventing mushiness. Searing the chicken creates a richer, more savory flavor. Use low-sodium soy sauce to control the saltiness. Simmer without stirring to ensure even cooking. Letting the dish rest allows the rice to absorb any remaining liquid. For a touch of acidity, add a squeeze of lemon juice at the end. Store leftovers in an airtight container in the refrigerator for up to 3 days.

")